How and from what to make a simple snow blower with your own hands for your home and garden?
 With the onset of winter, owners of suburban areas need to clear the territory of snow. You can simplify this seasonal chore with the help of a snow blower.
But if the owner cannot afford the purchase of this assistant, its analogue can be built independently from improvised means.
We'll tell you how to make a snow blower with your own hands in this article.
Content
Buy or make it yourself?
Due to the high cost, a snow blower pays for itself only in those regions where frequent and heavy snowfall occurs. If there is no constant need to clear the area, it is more advisable to make a snow blower yourself.
Such a unit will not only save money, but will also greatly facilitate the maintenance of the site., and will also become a source of pride for the owner. It’s not difficult to make a homemade snow removal machine—it’s enough to have a basic understanding of the technology and the principles of its operation.
Advantages of a homemade snow blower:
 Versatility. Most homemade appliances are made by repurposing old appliances, giving them new life or added functionality.
- Budget cost. Thanks to the use of available tools and components, the cost of manufacturing a snow removal machine will be minimal.
A device made by yourself will cost several times less than a new one.
- Compact dimensions. A snow blower assembled on the basis of a trimmer or chainsaw is significantly smaller than a purchased one. This allows you to use the device in hard-to-reach places.
Also, homemade units have low power and efficiency compared to factory ones. But if you use a powerful motor, the snow blower will surprise the owner of the site with its operational capabilities.
Features of manufacturing a machine for clearing snow from an area
Let's consider the manufacturing features snow blower:
Device
A snow blower seems like a complex machine, but it actually consists of 3 main components:
- Snow removal unit — a metal bucket located in the front part of the installation. An auger, rotor, or a combination installation is used as a mechanism for capturing snow. The volume of the captured snow layer depends on the dimensions of the bucket.
- Frames - a metal frame on which the main structural parts are attached.
- Movement mechanism. Non-self-propelled models move using wheels or skis and require constant pushing. Self-propelled units receive traction force from a motor (gasoline, electric).
 Additionally, the snow removal device is equipped with:
- snow drainage chute - this is a hose with a rotating canopy through which precipitation is discharged into a certain area of the site;
- handles for controlling equipment (both mechanical and automatic - with start, gas, clutch functions).
The snowplow must be equipped with rubber wheels with deep treads that provide good grip on slippery surfaces, or with skis.
Budget device for snow removal - a removable attachment that attaches to agricultural equipment (walk-behind tractor, mini-tractor). It can be purchased ready-made, or made independently. Such a unit will cost less than a full-size snow blower.
Types of homemade snow fence structures
Based on the type of snow collection, there are 4 types of homemade snow removal machines:
- Bulldozer. These are devices on wheels with a blade fixed at the front.
- Screw - installations that capture snow with rotating belts and feed it into a drainage chute.
- Fan-blade. These are devices in which snow is supplied to the fan using blades. From there it is blown up the pipe to the outside;
- Air-fan. The device, like a vacuum cleaner, sucks up snow masses and then throws them out through an outlet pipe to a specially designated place.
type of drive
If the owner of the site does not intend to constantly push the snow blower, he needs to equip the installation with a drive. He can be:
- Electric. The motor can be purchased or removed from an old tool (for example, a trimmer). But to process remote areas of the site, you will have to get a long carrier.
- Gasoline/diesel. To operate the device, it is enough to fill the tank with fuel.
Materials and components
The materials and components necessary for the production of a home-made installation for clearing the territory from snow are selected depending on the type of structure (on the basis of which device it will be made).
 The following tools may be needed for work:
- welding machine;
- Bulgarian;
- drill;
- hacksaw;
- hammer;
- vice; pliers;
- set of keys, screwdrivers;
- file.
From the trimmer
A compact, lightweight and budget-friendly snow blower can be made from a trimmer. For this, an electric scythe with a power of 1 kW or more with a flat rod is used. It is important that the rotation from the motor to the reel is carried out using a gearbox and a rigid shaft.
Sequence of work:
- Manufacturing of the body. A metal barrel of small diameter, which is cut at a distance of 15 cm from the bottom, is suitable for it. A hole is made in the center of the bottom of the housing for the protruding element of the gearbox, and along the edges of the housing - for fastening the shield. A 10x10cm hole is cut in the upper part of the cylinder to drain snow masses.
- Formation of the rotor mechanism. 4 rectangular plates (25x10cm) are cut out of sheet material and given the shape of blades. They are welded to the trimmer disc.
- Mounting a snow drain. It can be made from a 15x30cm strip of metal. The workpiece is bent to form a sleeve and welded to the corresponding hole in the body.
- Making a shovel for collecting snow. It is made from sheet metal 30x40cm. the edges of the plate are bent, forming sides about 2 cm high.The blade is secured at the bottom of the installation.
- The unit is assembled by fixing the gearbox to the bottom of the housing with bolts. The shaft is equipped with wings and installed instead of a lawn mower disc. The design is equipped with a handle.
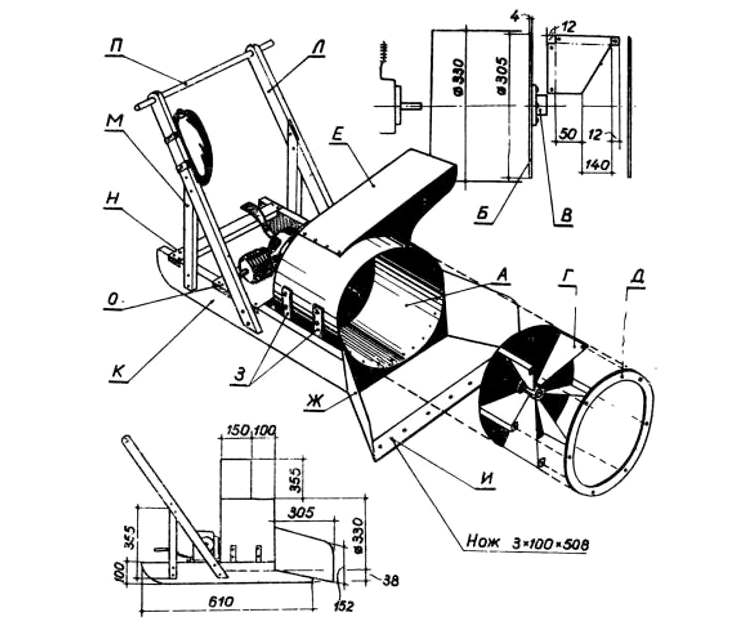
Drawing of a snow blower from a trimmer:
Snow blower example based on trimmer:
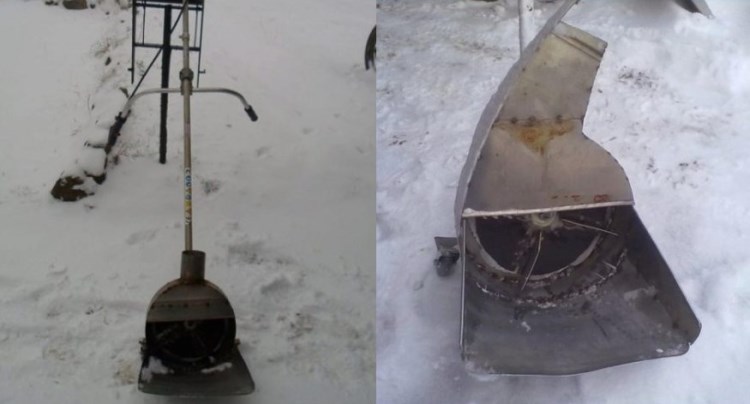
You can learn how to make a snow blower from a trimmer here.
Do-it-yourself snow blower from a trimmer, video instructions:
From a chainsaw
Based on a chainsaw engine, you can make a simple snowblower with high performance, but light, compact and budget-friendly. A motor from an old saw, for example, the Druzhba, Ural or Shtil brand, is suitable for installation.
Sequence of work:
- Drawing up a product drawing. Depending on the power of the chainsaw motor, the dimensions of the snowplow bucket are determined. On average, these figures are 50x40cm (WxH). If the motor is powerful, the dimensions of the bucket can be increased. Also at the initial stage, the main components of the structure (frame, auger, snow drain), their dimensions and method of fastening are determined.
- Checking the performance of the motor, removing unnecessary parts (handles, tires).
- Making the frame. A rectangular or square base is welded from a metal channel, to which wheels or runners that perform the function of skis are attached from below. The motor is secured to the top of the frame with bolts. Handles are welded to the back of the base.
- Forming a ladle from sheet steel.A strip 50 cm wide is cut out of galvanized material, bent in a semicircle, securing the shape with side shelves.
- Insert of an auger mechanism that scoops up snow with disc blades. It should be slightly smaller in diameter than the bucket. You can use an auger from old agricultural equipment. Knife blades are cut from steel or conveyor belt. The auger is installed inside the bucket on bearings.
- Formation of a snow drain. It can be made from a tin elbow or an aluminum pipe. It would be better if the sleeve is rotatable. To attach it, a hole with a diameter of 150 mm is cut out in the upper part of the bucket, into which a pipe for the exhaust pipe is welded.
- Attaching the bucket with the auger to the frame.
- Connecting the motor and auger with a belt, arranging chain drive elements (direct drive) between the shafts of these data. The operation of the mechanism is checked manually - all its elements must rotate easily without clinging to the body.
- Fastening the fuel tank to the frame.
- Start the engine.
- Protection of working mechanisms with a casing made of galvanized steel, installation of an ejection hose.
Drawing of a snow blower with a chainsaw motor:
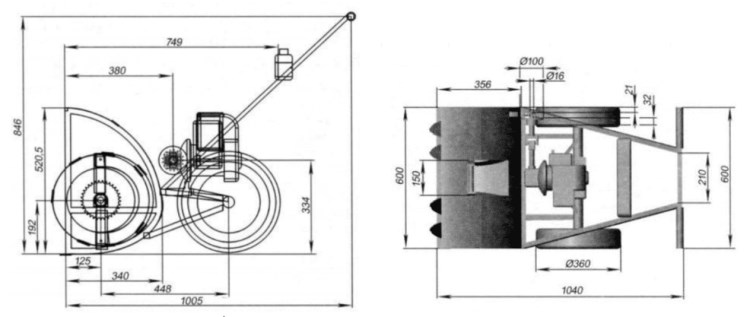
Option for a snow blower based on a chainsaw motor:
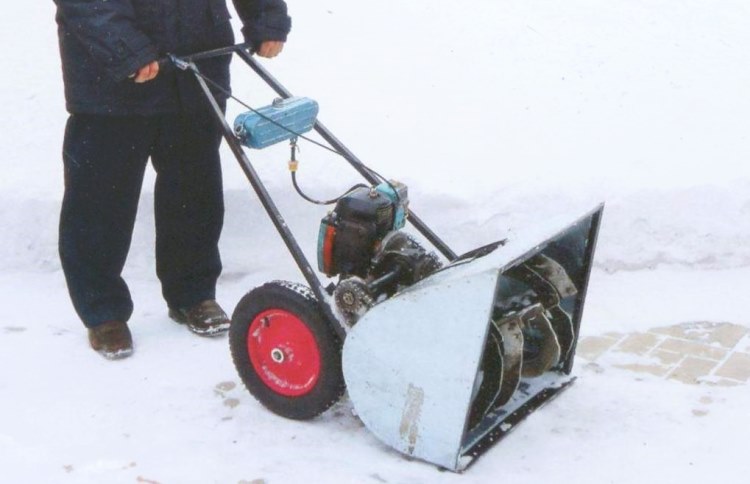
How to make a snow blower from a chainsaw, read here.
Chainsaw snow blower, video instructions for making:
Based on a walk-behind tractor
Equipping a walk-behind tractor with a blade is a simple solution for effectively removing dense and large lumps of snow. The powerful engine of the device powers the self-propelled unit:
- the bucket takes away the snow,
- the blades feed it into the device,
- pushing through the outlet sleeve for several meters.
Motoblock snow blower done in 3 ways:
- By attaching a ready-made bulldozer attachment to a walk-behind tractor via a special adapter. This installation will cut off the snow cover and move it to the side. Its cost is quite high, because factory components are used.
- By attaching a bucket equipped with a screw mechanism and a pipe for snow removal to the walk-behind tractor. This installation is more complex to manufacture, but increases the efficiency of cleaning the area.
- Using the method of installing a fan snow blower. To do this, the bucket is equipped with blades that rake up snow, an outlet pipe with a connected fan, which ensures that the masses are thrown over a certain distance.
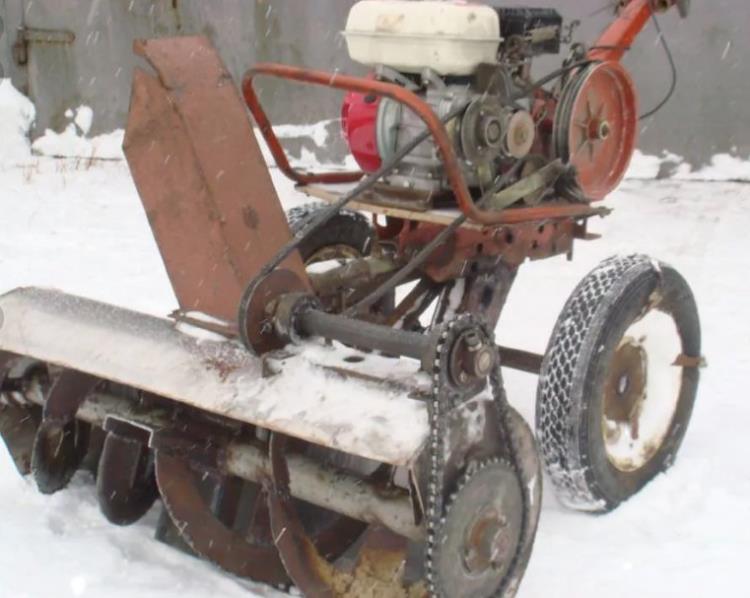
Options for snow blowers made on the basis of a walk-behind tractor:
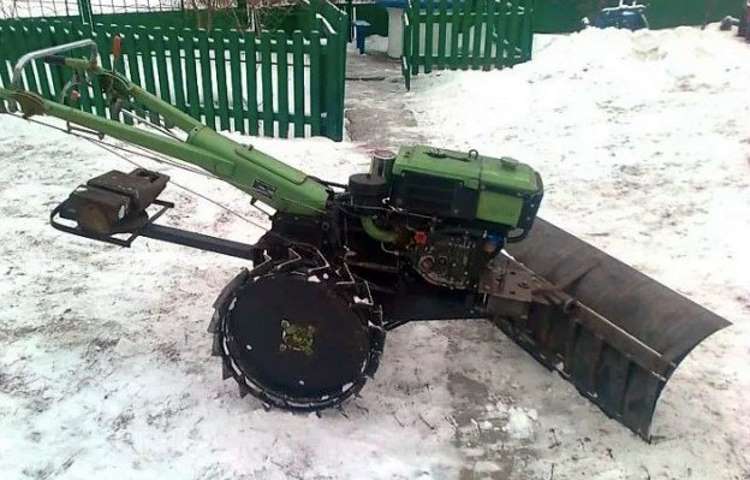
Will tell you how to make a snow blower from a walk-behind tractor this article.
Do-it-yourself snow blower for a walk-behind tractor, video instructions:
From a gas cylinder
A bucket for collecting snow is made from a household gas cylinder, which can be used as a manual blade or attachment for a self-propelled unit (walk-behind tractor, cultivator). This is a simple, fast and budget-friendly snow removal unit.
Work begins with drawing up a drawing of the product, determining its dimensions so that the bucket matches the dimensions of the self-propelled unit. To make a snow blower, an empty cylinder in which there is no pressure is used.
Sequence of work:
- the cylinder is fixed on both sides on a flat surface, then markings are made on it so as to form a curved bucket;
- cut the product, protect the edge of the cut with a file to get rid of sharp edges;
- a screw mechanism (finished or assembled from 4 steel circles) is installed inside the cylinder;
- a shaft is placed inside the auger, having previously made holes for it;
- the ends of the shaft are fixed on the side walls of the cylinder.
- The finished bucket is attached to a self-propelled unit (walk-behind tractor), connecting the auger mechanism to the motor using a belt drive; after warming up, the unit is ready for work.
Cutting a cylinder for a snow blower bucket:
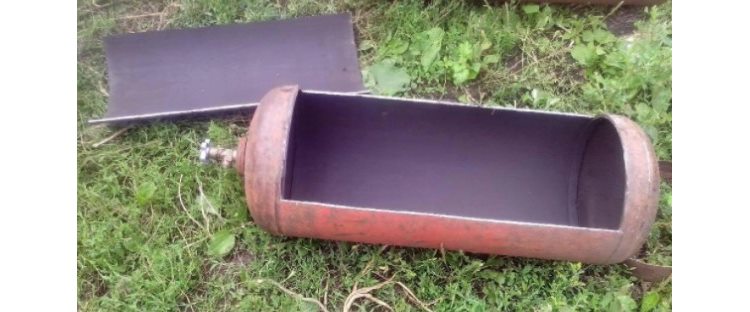
Installation for clearing an area with a bucket from a cylinder:
Snow blower made from a gas cylinder, video instructions:
From a wheelbarrow
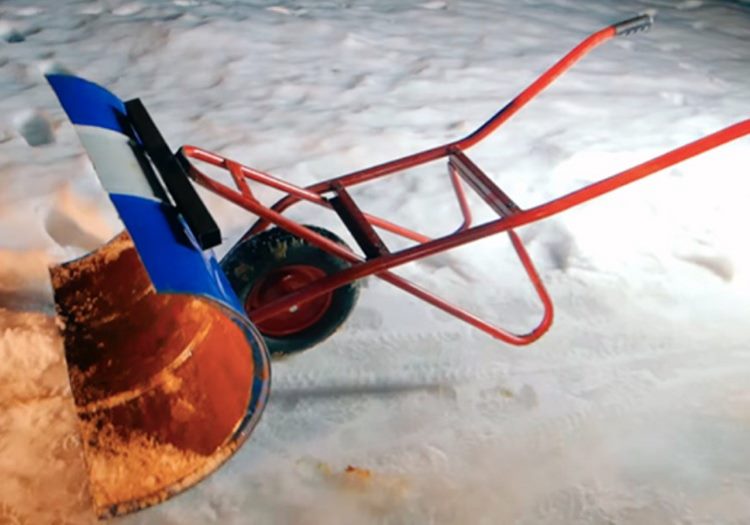
This is a non-self-propelled unit for clearing snow from small open areas covered with asphalt or paving slabs. It is a shovel blade mounted on the frame of a wheelbarrow. The snow blower moves with the help of its original wheel, the force is spent only on pushing the unit forward.
Manufacturing sequence snowplow from a medium-sized wheelbarrow:
- Formation of a blade measuring 80x40cm from sheet steel. The shovel is a rectangle with curved edges that make it easier to grab snow.
- Attaching the blade to the wheelbarrow body. A continuation of the wheelbarrow frame is formed from a metal profile, and the blade is fixed at an angle of 45° using steel clamps.
Scheme for connecting the blade to the wheelbarrow:

An example of a snow blower based on a wheelbarrow:
From a scooter, motorcycle or ATV
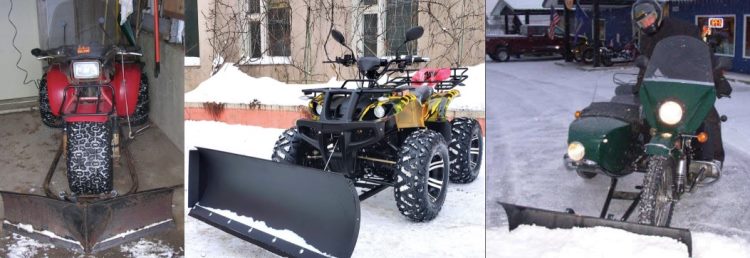
Each of these machines can be adapted for snow removal by adding a blade. A necessary condition is the transmission of energy through a gearbox and a rigid shaft.
Sequence of work:
- Making a C-shaped bucket from a steel drum or gas cylinder. The blade can also be V-shaped (welded from sheet material).
- Formation of a frame connecting the blade to the machine body. For its manufacture, a metal profile or medium-section pipes are used.
- Attaching the hinged structure to the machine body. This uses a bolted connection so that the blade can be easily removed.
Options for snow blowers from a scooter, ATV and motorcycle:
Do-it-yourself snow plow for an ATV, video instructions:
From a barrel
From this tank you can make a simple snow shovel-bucket. It is better to use a metal barrel as a workpiece (plastic is less resistant to loads and deformations).
Sequence of work:
- Drawing cutting lines - the contours of the future product. When using a 200L tank, you will need a segment equal to 1/3.
- Cutting the barrel along the given contours with a grinder.
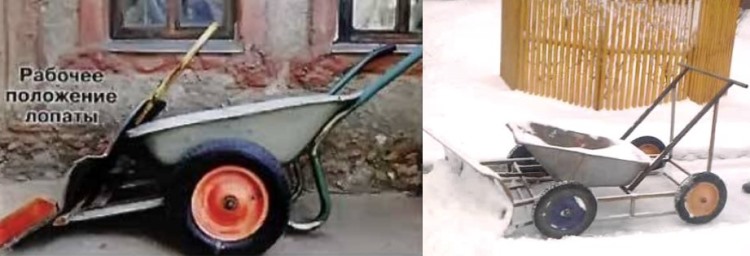
- Frame manufacturing. It can be welded from a profile or used ready-made, for example, from a wheelbarrow. In the second case, it is enough to remove the body from the product.
- Assembly of the structure. The bucket and the frame on the wheel are connected using bolts. This way the structure can be disassembled after winter is over.
Device for removing snow from a barrel and wheelbarrow:
Snow blower made from a barrel and a wheelbarrow, video instructions:
From the cultivator
A cultivator is a universal equipment that can be used not only for agricultural, but also for household work. To remove snow in winter, it is enough to attach the appropriate equipment to it. It could be:
- Dump. It is made from sheet material, a barrel or a gas cylinder. The hitch is attached to the cultivator frame using a bolted connection. In order for the shovel to rake the snow to the sides, it is installed at an angle to the working surface. It is also recommended to sharpen the bottom of the bucket so that it effectively cuts the layer of snow.
- Rotary snow removal attachment. The manufacture of such a canopy requires labor-intensive milling and turning work. The snow removal mechanism consists of a housing, inside of which an auger with spiral knives is mounted on bearings. As they rotate, they capture snow and feed it into the central part of the structure, where a rotor with two blades is installed. These blades pick up the masses and push them out through a special nozzle (snow drain). The most difficult part of this design to manufacture is the auger. It’s easier to take it from old agricultural equipment.
Rotary snow removal attachment for cultivator:
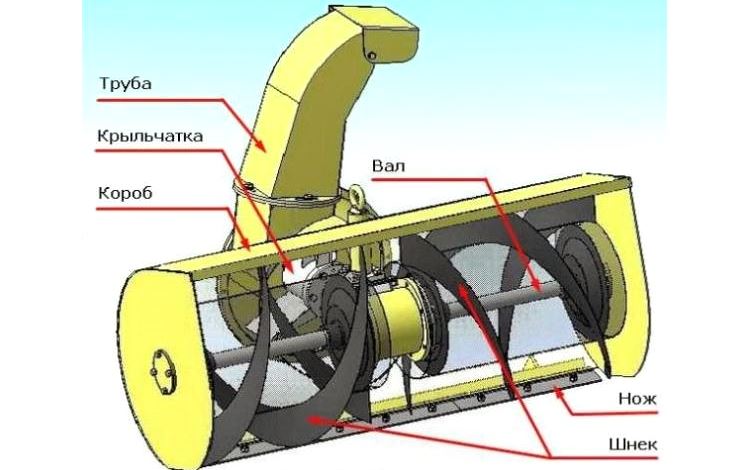
Snow blower from a cultivator, video instructions:
Manufacturing safety precautions
Regardless of the manufacturing method of the snow blower, All work should be carried out carefully:
- check the tightness of fuel tanks;
- assess the reliability of fixing parts;
- check the operation of the unit at idle speed;
- perform long-term noisy work with headphones, and welding and turning - with safety glasses;
- do not smoke or light a fire near the workplace;
- Assemble the unit wearing tight-fitting clothing and non-slip shoes to prevent accidental injury;
- follow the direction of snow removal - do not direct the mass towards windows, fragile objects, people and animals.
After clearing the area of snow, the car should be inspected for integrity, cleaned of dirt and stored.
Conclusion
You can make a snowblower yourself from almost any equipment powered by an electric or gasoline engine. The cost of such a homemade installation will be several times cheaper than a factory machine. A universal and budget option are removable devices compatible with walk-behind tractors and walk-behind tractors.


