How to correctly replace the bearing of a Candy washing machine with your own hands?
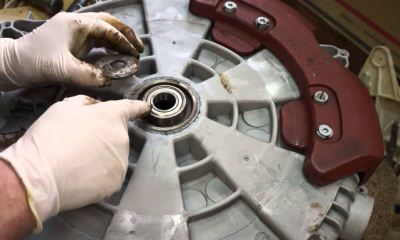 One of the most common problems with washing machines of all brands is bearing wear. This also applies to Candy machines.
By replacing the bearing, you can extend the service life of the machine for some time, postponing an expensive purchase for several months or even years.
We will tell you below how to replace the bearings of a Candy washing machine.
Content
When do you need to change Kandy washing machine parts?
There are several main causes of failure bearing:
- the service life of the components has expired;
- the oil seal is damaged;
- the equipment is operated in violation of the rules.
If the reason is a damaged oil seal, then the bearing breaks due to increased friction. This happens as follows: cracks appear in the oil seal, it begins to let water through, and the water washes away the lubricant (which softens friction). As a result, the bearing fails, and both parts have to be replaced.
Owners of belt-driven vehicles especially often encounter this type of breakdown. Their design features are such that small parts experience increased loads and therefore may break prematurely.In any case, at the first sign of problems with the bearing, it should be replaced as quickly as possible.
Signs of breakdown bearings are as follows:
 The first sign is the appearance of extraneous noise when the machine is operating. This may be a metallic clang, crunch or squeak. The sounds usually get louder when the spinning process begins.
- Damage to the edge of the rubber cuff. They arise as a result of the fact that when rotating, the drum, which has lost its balance, begins to vibrate, erasing the seal.
- Often, car owners notice the very fact that the car has begun to vibrate more strongly, and this is also a clear sign of bearing failure.
- Deterioration in spin quality. A damaged bearing assembly does not allow the equipment to work at full capacity, so the laundry remains wet after spinning.
How to replace?
You can replace the bearings yourself. To do this, you need to purchase the bearings and oil seal themselves, prepare the appropriate tools, and strictly follow the instructions.
Tools and accessories
Replacement is carried out using the following tools:
- set of wrenches;
- screwdrivers;
- metal rod (needed when knocking out the bearing);
- pliers;
- hammer.
In addition, you will need a sealant, as well as universal penetrating lubricant VD-40.
Disassembling a household appliance
Disassembly procedure:
- remove the top cover by sliding it back (after unscrewing the screws);
- remove the counterweight plate;
- remove the back panel (by unscrewing the fasteners);
- Pull the right and left top panels up and out;
- Unscrew the bolts on the sides;
- disconnect the wiring, take a photo of it;
- remove the control panel (squeezing out the plastic latches);
- remove the fill hoses
- turn off the pressure switch and remove it;
 remove the control unit and board;
- take a photo of the wiring;
- remove the rheostat;
- disconnect the clamps (internal and external);
- remove the cuff from the hatch door;
- remove the tray (by unscrewing the screw);
- disconnect the powder receiver pipes;
- remove the belt, heater, engine, temperature sensor;
- remove the remaining part of the wiring;
- disconnect the hose from the tank and pump;
- remove the empty tank and remove it through the door (lifting it from the side springs);
- remove the counterweight and cuff from the tank;
- unscrew the top of the tank;
- remove the sealing gasket;
- remove the pulley by turning the tank upside down;
- fix the pulley with a screwdriver, unscrew the nut;
- open access to the shaft by removing the pulley;
- replace the original nut with a similar one (so as not to damage it);
- carefully knock out the shaft by hitting the nut with a hammer;
- remove the lower part of the tank, releasing the drum;
- check the integrity of the crosspiece (if damaged, replace it);
- Clean the shaft completely and inspect it (if there is the slightest damage, replace it).
Replacement
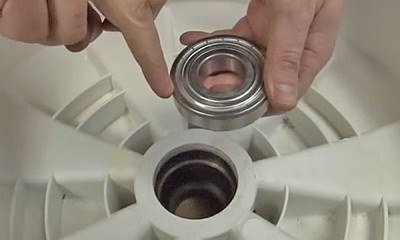
To get to the bearings located in the drum (its rear wall), you need to remove the oil seal. To do this, pry it off with a flat screwdriver. A new oil seal will need to be installed. After this, the outer and inner bearings are carefully knocked out with a hammer on a metal rod (in exactly that sequence).
The next step is replacing the seals. Before installation, it is treated with a water-repellent lubricant.
Assembly and testing
First, the tank is assembled. Both parts of it must be thoroughly cleaned of dirt and scale, only then fixed.The joints are treated with sealant. The gasket that fits between the halves of the tank should also be replaced with a new one. The bolts are tightened crosswise.
The entire process of assembling the machine is carried out in the reverse order of the disassembly process. First you need to descale the heater, and then gradually return the parts to their places.
 Check the wiring connections with the photos taken earlier. Inspect all elements being installed in place, clean off dirt, and replace if necessary.
After assembly is completed you need to wait until the sealant that was applied to the joints of the drum hardens. The curing time is indicated on the sealant packaging.
After this, the machine should be connected, some powder should be added, and started for testing. During the test wash process (in normal mode, but without laundry), residual grease and dirt will be removed from the machine, and unpleasant odors associated with the repair process will go away. At the same time, the machine should operate quietly, without excessive vibration.
After testing, check if water has appeared under the car.. If the machine washes quietly and does not leak, it means the replacement was successful.
Buying a bearing
Bearings (1 external + 1 internal) and oil seal that will be used during repairs must be selected correctly. They should be purchased at service centers or specialized stores. Can be ordered online.
The most important thing is to select the parts in exact accordance with the model. It is advisable to install branded components or high-quality analogues. Cheap replacements break down quickly, and installing them can further damage the car.
Original spare parts are much more expensive, but they are much more reliable and durable. They cost from 3 thousand rubles and above.If the machine is already quite worn out, and bearing replacement is planned to extend its operation for several months, you can install a less expensive analogue for 1-2 thousand.
Possible difficulties
It is not recommended to replace bearings yourself without basic knowledge of the design of such equipment. Since the part being replaced has a complex location, to get to it you need to remove many other components, and this is a complex technical process.
 But the main difficulty lies in reassembly cars. What is easy to disassemble can cause a lot of trouble when installing in its place. It is especially difficult to return all elements of the machine's electronics to their original state.
There are other difficulties in this event. The task of removing old bearings and installing new ones is not an easy one. If this fails, you will need to call a technician, and the car will remain in a disassembled state until he arrives.
In addition, without the necessary experience, you can easily make a mistake in choosing the bearing size; this can only be clarified after complete disassembly. Another important nuance - when disassembling the car, it is advisable to take the opportunity to inspect all the components being removed and, if necessary, replace them.
But It is quite difficult for a non-specialist to assess the condition of the parts. As a result, it may happen that immediately after replacing the bearing something else will fail.
Call a specialist and price of work
Without having the skills to repair household appliances, it is better to entrust the bearing replacement to a qualified technician.But this option comes with certain risks.
Firstly, the master may damage something in the process if his qualifications are not high enough. Secondly, his services may be too expensive. Thirdly, he can quietly replace any “original” part of the car with a low-quality, cheap analogue.
The final amount of the service must be agreed upon before the technician begins work.. And during the process of replacing a part, it is advisable to be nearby.
The cost of such repairs depends on the level of the technician, the inclusion of additional services (diagnostics, replacement of other parts, etc.) Prices may vary significantly in different cities. On average, replacing a bearing costs from 1 to 3 thousand rubles.
Video on the topic of the article
Video instructions for replacing the bearings of a Kandy washing machine:
Conclusion
A bearing is a part that wears out earlier than others. Bearing failure affects the operation of the machine. Having noticed the first signs of bearing wear, you need to stop using the machine and replace it.
You can replace the bearings yourself (following the instructions). Another option is to call a professional. You should choose a specialist carefully and carefully.
