Detailed instructions on how to disassemble and reassemble a Kandy washing machine
 Kandy washing machines are considered high-quality equipment that enjoys the trust of customers.
But during operation, even very reliable devices can fail over time. In case of complex breakdowns, it is sometimes necessary to completely disassemble the washing machine.
We'll tell you how to disassemble a Kandy washing machine below.
Content
Preparing to disassemble the Candy washing machine
Disassembling a Kandy washing machine is not an easy task and requires preparatory measures. For repair work you will need to select certain tools:
- set of screwdrivers (slotted, Phillips);
- pliers;
- a set of keys;
- hexagons included in the set;
- small hammer.
If you plan to saw the tank, you will also need an appropriate tool to separate it into two halves. After repair work, the tank will need to be welded to restore its tightness.
Before starting disassembly, the washing machine should be de-energized and disconnected from the water supply. It is also advisable to drain the remaining water from the tank in advance.. This can be done through a drain filter, so you need to stock up on rags and a low container for draining water.An alternative option for draining is to release the end of the drain hose from the tap into the sewer, and lower its end into a basin placed on the floor.
It will be useful to take photographs of all stages when disassembling the washing machine. This will help you assemble the washer without any problems in the future. You can also make marks on parts with a marker.
Features of the household appliance
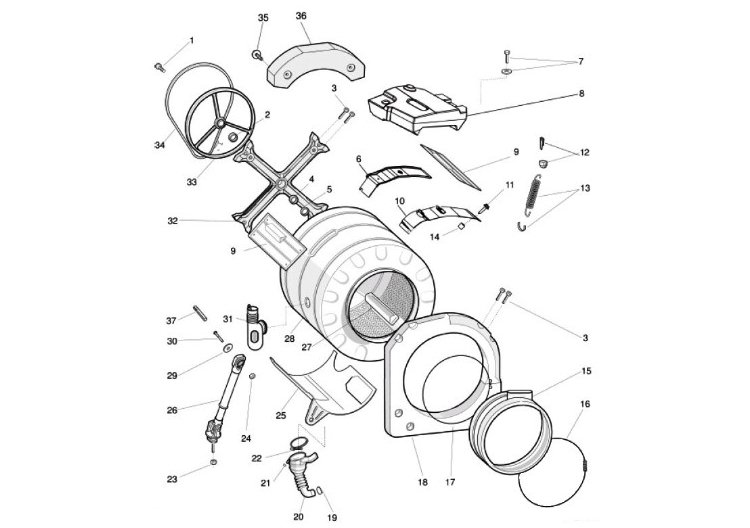
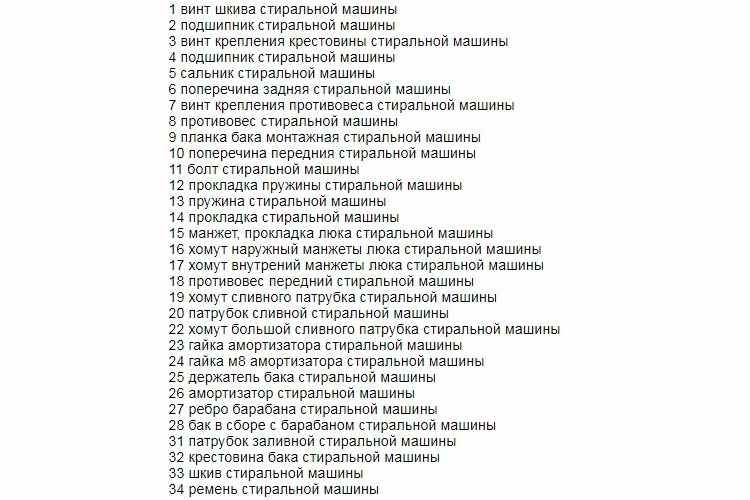
Kandy washing machines are available in a wide range of models. The differences are not only in the details and breadth of functionality, but also in the location of some components. To better cope with the disassembly task, convenient to navigate according to the diagram of a specific model.
General layout of the washing machine:
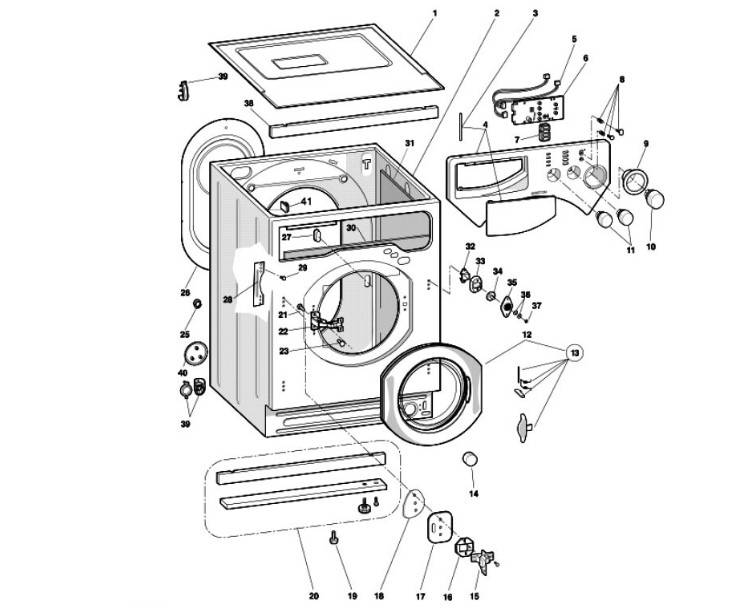
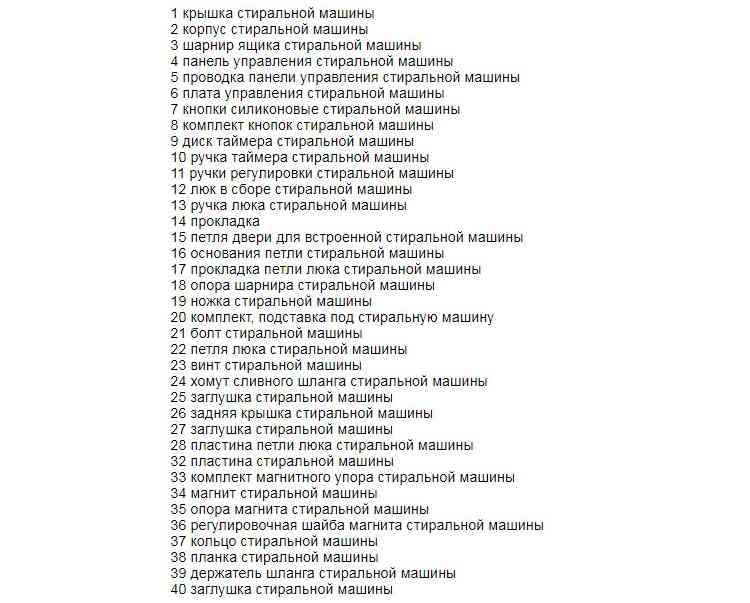
Diagram of the tank and drum structure:
Disassembly of the device taking into account the type of loading
The need to completely disassemble a washing machine does not arise often. This may be necessary if there are problems with:
- tank,
- cross,
- bearings,
- oil seal, etc.
The process of disassembling a washing machine begins with opening the case. For ease of operation, it is advisable to place the washing machine in a free space in order to have access to the device from all sides. The best option for choosing a place to dismantle equipment is to carry out repairs in a specialized workshop.
Frontal
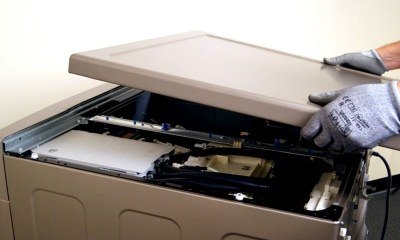 In Kandy front loading washing machines it is necessary to remove the top cover and the back wall of the case. This ensures sufficient access to the nodes.
The parsing process must be sequential. It may start by removing the service panel or disconnecting all motor contacts.
Removing the control panel is conveniently combined with disconnecting the dispenser. The control module is also detached and moved to the side.
Complete disassembly of the washing machine involves removing the hatch door. This part is held in place with screws. But first, the rubber cuff is released (the clamp that secures it from the outside is removed) and tucked inside the drum.
The upper counterweight is removed. The tank is disconnected from the pipes and shock absorber mounts. Depending on the model of the washing machine, there may be different types of pipe clamps and shock absorbers.
The tank in washing machines can be a non-separable or collapsible part. In the first case, if it needs to be opened for some reason, then after removing the part from the washer body, up to 20 holes are made along the seam, adhering to which the cut is made using a hacksaw.
You need to work very carefully, making sure that the cut is no deeper than 50 mm. If you act carelessly, you can easily damage the drum. With a collapsible design, everything is simpler - all the screws are unscrewed at the junction of the two parts.
Disassembly of the tank may be necessary to gain access to, for example, the shaft. To operate the tank, after cutting, place the hatch down and unscrew the central screw. The drum is separated from the walls of the tank using a hammer and wooden blocks for support. If the problem is in the oil seal or bearings, it is also possible to replace them with new parts.
The removed tank must be thoroughly rinsed from the inside.
An example of disassembling a Kandy front-loading washing machine is in the video:
Vertical
To disassemble a Kandy top-loading washing machine, you will first need to remove the service panel. You can carefully separate the control panel by lifting it on all sides., helping himself with a screwdriver. This part should be moved upward and then towards the rear wall to open access to the wiring.
At this stage, you should photograph all the terminal connections, and only then disconnect them. The removed panel can be set aside.
The next step is to remove the side panel, which is secured with screws. The panel is pushed along the lower edge of the body towards itself and moved down. After removing the side panels, access to the fasteners on the front wall of the device opens.
Reassembly
When the reason for the forced disassembly of the washing machine has been eliminated, it is necessary to reassemble it. To do this, it is convenient to use previously taken photographs in reverse order.
Possible difficulties
When disassembling a Kandy washing machine, you may encounter a number of difficulties. Most often these are the following problems:
| Possible problem | Ways to solve a problem situation |
| Difficulty with assembly sequence | When disassembling a washing machine, all stages of the process must be photographed. |
| There are missing parts during assembly | Parts removed during disassembly of the device must be placed in a certain place so as not to be lost |
| No matching key | To repair a washing machine, it is advisable to prepare a set of screwdrivers and a set of keys in advance. |
| Worn clamps detected | Worn fasteners are replaced with new ones |
| It’s impossible to detach the fasteners, a self-tapping screw is welded, etc. | It is necessary to apply lubricant to the threads/joints of the parts; this will help to unscrew the screws and self-tapping screws. |
| The tank cannot be pulled out | It is necessary to check that all fasteners are disconnected, including paying attention to the shock absorbers that are located below.It should also be taken into account that the counterweight to stabilize the tank is quite heavy |
| The drum was damaged when the tank was cut carelessly | The damaged drum is replaced with a new one |
| Leaks, seal failure | The cause of the leak is a broken seal of the components that come into contact with water. To fix the problem, you should re-inspect the washing machine to determine where the water is leaking. |
| The new replacement part does not fit into its intended place | Most likely, the new part does not match the washing machine model. It is also worth making sure that the part is installed in the correct position. |
Conclusion
Disassembling a Kandy washing machine on your own is a responsible undertaking. After completing the repair, it is very important to correctly assemble all the components and check the connections to ensure tightness.
Work should be carried out in compliance with safety regulations. If you don’t have confidence in your abilities, it would be better to entrust the disassembly of the washing machine to a professional.
