Simple instructions for replacing the cuff on an Indesit washing machine
 The rubber cuff of the loading hatch is responsible for the tightness of the door. As a result of physical wear and tear, the part no longer fully performs its functions.
To prevent leaks, the rubber band must be changed. You can do this yourself or with the help of a technician from a washing machine repair company.
We will talk about the procedure for replacing the cuff on an Indesit washing machine below.
Content
Causes of damage to the hatch sealing rubber
Most often, damage to the integrity of the rubber cuff is caused by natural wear and tear, but the defect may also be the result of careless handling of equipment. The seal has fairly high strength and good resistance to mechanical stress during operation of the machine.
Damage may result from:
- friction during the washing process on hard objects (for example, shoes, zippers, etc.);
- careless placement of things in the drum;
- inaccurate removal of things from the drum;
- foreign objects getting into the seal - coins, buttons, keys forgotten in a pocket, etc.;
- damage by pets.
In addition, rubber wears out as a result of exposure to detergents and water.
If the cause of the cuff damage is not determined, replacing it may become a regular occurrence.
How to remove a part from an Indesit washing machine?
In order to replace the rubber on the hatch, you must remove the old cuff. You can even do the work yourself. At the preparatory stage, it is necessary to disconnect the washing machine from the network. To do this, remove the plug from the socket.
Additionally, you can remove the door to provide yourself with more convenient access to the cuff. But this is not necessary, since the seal can be dismantled with the door attached.
Work algorithm:
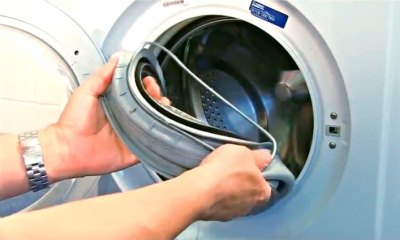
 You need to find the clamp that holds it under the edge of the elastic. This is a metal cable with a spring insert to provide the necessary tension.
- The clamp is removed by prying it off with a flat-head screwdriver. It is convenient to do this in the area where the spring is located.
After this, it will be easy to remove it around the entire perimeter. This part must be set aside so as not to be lost - it will be needed at the stage of installing the new elastic band.
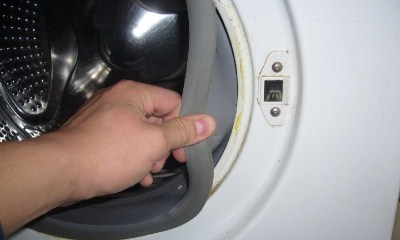
- Separate the front part of the cuff from the body. You can start from any area.
- Find a mark that indicates how the elastic should be positioned relative to the drum. You can make a small mark on the body with a marker to make correct installation easier in the future. But you don't have to do this.
- Pull out the rubber seal along with the inner clamp.
How to replace and install a new one?
When the old rubber cuff has been removed, you can immediately begin installing the new part. This must be done very carefully:
- There should be a triangle-shaped protrusion on the top. It is joined so that it matches the mark on the typewriter. To make installation easier, the groove of the rubber band can be lubricated with a couple of drops of liquid soap or shower gel.
- In the lower part you need to navigate by the marks and drain holes.
- The replacement process starts from the top. While holding the elastic in position, you need to tuck the seal inside.
- Moving left or right, you need to gradually put the elastic band on the tank.
- After the seal is put on, you need to check that all marks match.
- After installing the rubber band, you need to put on the clamp. This can be done by turning the edge of the seal inward. To make it easier to install the clamp, it should be pryed and guided using a screwdriver, constantly monitoring the position.
- After the clamp is put on, you need to check its location and the quality of fixation of the elastic band. If wrinkles or creases are detected in the elastic, it is straightened, eliminating the defect.
- If you have doubts about the quality of the first stage of installation, check the tightness of the rubber seal. To do this, manually fill the tank with water, using, for example, a ladle or a large mug. If there is a leak, it must be repaired immediately. After testing, the water must be drained.
- The outer part of the cuff is mounted by pulling the elastic band onto the body evenly along the entire perimeter of the hole.
- The outer clamp is installed in the recess along the entire part so that it fits into the recess intended for it.
If, after putting on the rubber band, it turns out that the marks have shifted, the part should be removed and reinstalled.
The video will show you how to change the cuff on an Indesit washing machine:
Purchase rules
When replacing the cuff yourself, It is advisable to purchase a new part in advance. This will allow you to combine the dismantling with the installation of the elastic band, and you can start using the washing machine literally right away.
You can buy a cuff in an online store or at specialized retail outlets. The elastic band is selected taking into account the serial number of the model. This is an important point, since not all seals are suitable for washing machines, even among products from the same manufacturer.
This information is in the documents for the device., but it can also be found on a sticker that is present on the back of the hatch.
If there are difficulties with identification, the sticker with useful information can be photographed and presented to the manager, who will help you choose the right product. The cost of cuffs for TM Indesit washing machines averages from 1,000 rubles and above, taking into account the model and place of purchase.
It is strictly forbidden to select an elastic band “by eye”, because it's easy to make a mistake.
Contact the master
 If you are not sure that you will be able to replace the rubber band on the Indesit washing machine yourself, you should seek the help of a specialist.
The easiest way to find a home appliance repair company is on the Internet. By searching for “Indesit washing machine repair” and indicating your city.
Studying reviews about the company will help you decide on the choice of company. and the specialists working in it, as well as studying information from the site.
The cost of performing work may vary by region. In the capital, you will have to pay from 1,900 rubles to replace the sealing cuff.Please note that the cost of the elastic band is not included in the price.
When contacting an appliance repair company, it is advisable to indicate the make and model of the washing machine on which the rubber band needs to be replaced. If the seal that will need to be supplied has already been purchased, the dispatcher must also be notified about this.
If other faults need to be eliminated at the same time, such work will be paid for separately. After the work is completed, the company’s specialist issues a guarantee..
Prevention measures
The wear of the rubber band of a washing machine is affected not only by the operation of the equipment under normal conditions, but also by violation of the rules of use.
To ensure that the hatch seal lasts a long time and does not lose its qualities, It is recommended to follow these tips:
- you should put things in and take them out of the drum carefully, trying not to cling to the rubber band;
- It is better not to overload the drum when loading laundry, as this creates an increased load on the elements of the device, including the door seal;
- before placing laundry in the drum, you must check the pockets of items, and do not send items with decor that have sharp edges or other elements that can damage the rubber into automatic washing;
- Do not allow water to accumulate in the recess of the rubber ring, as this may cause the development of fungus;
- After running the program, it is advisable to leave the door ajar to ventilate the washing machine;
- The rubber of the hatch should be protected from pets and children's pranks.
A lot of important and useful information about the repair of Indesit washing machines is presented in this section.
Conclusion
Replacing the rubber band on the Indesit washing machine must be carried out if there is physical wear of the part. You can do the work yourself or call a technician from a home appliance repair company.


Thank you!