Instructions for making and decorating a cardboard box for storing things with your own hands
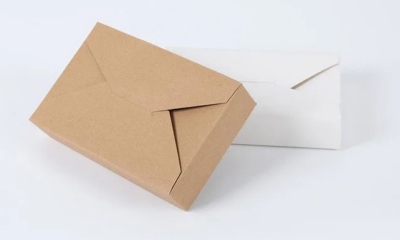 Beautifully decorated cardboard boxes can very well solve the lack of storage space in any home.
With proper design, such a product will become an independent piece of furniture in which you can place almost any thing.
Read the article on how to make a cardboard storage box with your own hands and how to decorate it.
Content
How to do it?
No matter what method is used to make the box, to get the job done The following materials and tools will be required:
- cardboard;
- ruler;
- pencil and eraser;
- tape or glue;
- scissors.
It is most convenient to work at a table from which all foreign objects are removed.
First way
First you need to decide on the size and shape of the box. Depending on this, a sheet of cardboard is selected, which is lined out.
Procedure:
- A square or rectangle is drawn in the center, which will serve as the bottom. Then add the height of the walls. It should be equal for each side.
- Fold the cardboard along the drawn lines. If it is too tight, then it is easier to make folds using a ruler.
- Squares are formed at the corners, each of which needs to be cut off on 1 side. The top left has a vertical right line, the top right has a bottom line, the bottom left has a top line, the bottom right has a vertical left line. Proper cutting will help shape the valves.
- Each valve is coated with glue on the outside and the walls of the box are formed.
- The lid is prepared in the same way, but its walls should be smaller.
If thick cardboard is used for work, then small wedge-shaped protrusions are formed when dividing the walls.
Second option
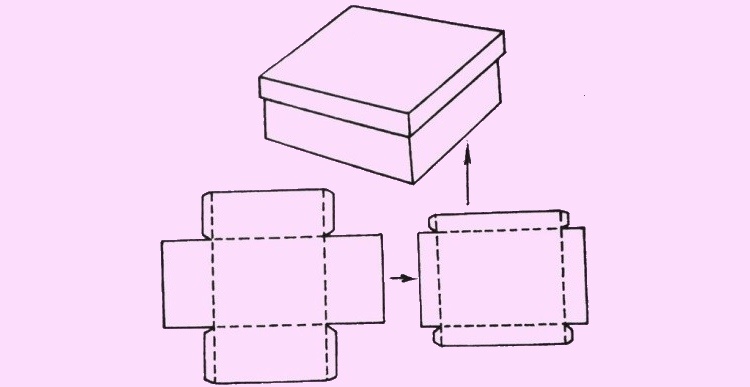
This method is suitable for those who want a lockable box in the form of a cube. It is most convenient to do it using a template. It is represented by 4 squares arranged vertically. From the second upper square there are one side one, to the right and to the left. Each square, except the bottom one, must have walls.
After the template is ready, it is cut out and folded along all the drawn lines. The valves on the front side are coated with glue and the box is assembled. The final product is cast, that is, the lid is not completely removed, it is inserted inside the box.
Third
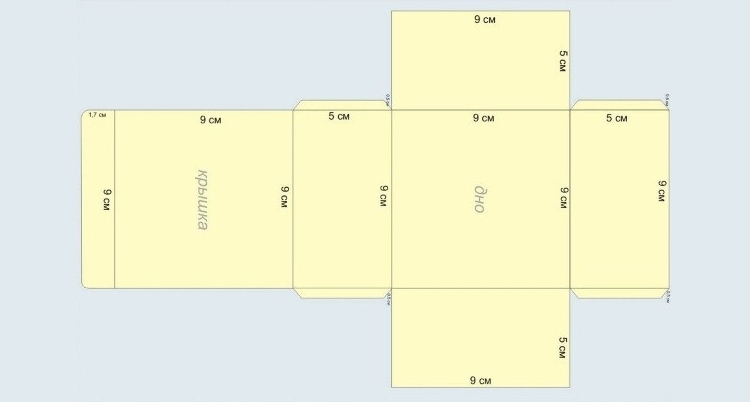
This method is suitable for those who want to make a high-quality and durable box. To create it, it is better to take thick cardboard. If you cover it with colored paper on top, this will give the product additional strength. The size of the box can be any, depending on the needs of its owner.
Preparation method:
- Make blanks for the box itself and the lid. They are presented in the form of rectangles, from which smooth sidewalls extend. The lid should be slightly larger than the base in order to fit freely on it.
- They cut out the base and similarly prepare the paper that will be used to cover the box. It should follow its shape.
- Draw along the broken lines with a paper knife. However, you should not press too hard so as not to cut through the cardboard completely. A knife is used to mark the fold lines.
- Fold the box and lid along the prepared lines.
- The sides of the sides are fixed with masking tape.
- Glue is applied to the bottom of the product from the outside and colored paper is attached to it. Then the sides are coated. Cover the lid in the same way. The edges of the colored paper should overlap inside the box.
All you have to do is wait for the glue to dry, after which you can use the box you made yourself.
The video will show you how to make a cardboard box with your own hands:
How to decorate?
A box made of ordinary cardboard does not look very attractive. You can fix this by decorating it.
Several popular ways to decorate box:
- cover it with newspapers - old newspapers or foreign magazines are best; if you don’t have them in the house, you can print paper from the Internet;
- remnants of wallpaper - such a box will fit into the interior of the room;
- wrapping paper;
- foil;
- paper napkins with beautiful designs.
A more complex technique is decorating a box in decoupage style. The procedure is as follows:
- Apply acrylic glue to the surface of the box and wait for it to dry.
- Place a napkin with a pattern on the surface of the box.
- Cover the napkin with parchment and iron it with an iron.
- Remove everything unnecessary.
- Cover the box with a thin layer of varnish.
The box is decorated in the same way around the entire perimeter. When the varnish is completely dry, iron each side through the parchment again.
Decoupage of a cardboard box, video instruction:
What can you cover with?
Storage boxes are often lined with fabric. To do this, you can use a canvas in a single tone or several flaps.
To complete the work you will need:
- scissors;
- needle and thread;
- PVA glue;
- double sided tape;
- decorative elements.
The fabric is cut according to the same principle as the box. However, you need to leave a margin of 1-1.5 cm on each side.When the pattern is ready, wrap it around the box, securing it from the base with double-sided tape. Do the same with the walls. Buttons, beads, stripes, and rivets are used as decoration.
Helpful information
Tips for making and care for cardboard boxes:
 It is better to cut the box according to a pre-prepared template. This will prevent damage to the cardboard.
- The box needs to be maintained regularly to prevent it from becoming a storage area for dust. If the product is covered with several layers of varnish, wipe it with a slightly moistened cloth.
Dust is removed from cardboard boxes without additional treatment using a dry cloth.
- When choosing cardboard, you need to focus on its color. The white material is easy to cut, but it is fragile, breaks easily and can peel off, so it needs additional reinforcement. Yellow cardboard is stronger, flexible and easy to cut. Gray cardboard is difficult to cut and dulls knives. It is best used for making large storage containers.
- To avoid damaging the table surface during the cutting process, it is protected with a board or thick oilcloth.
- The easiest way to cut cardboard is with a knife. Scissors are used only to create curved lines.
- When cutting, the knife should be moved in one direction; if you move it back and forth, the cardboard will tear and wrinkle.
Conclusion
Handmade cardboard storage boxes will become especially valuable interior items. After all, you will have to put a lot of effort into creating and decorating them.
At the same time, they have a number of advantages:
- practicality,
- cheapness,
- long service life.

